Getting Started & Installation
MOZA HMA150 & Motion Manager Software Setup Guide
For MOZA HMA150 motion: software installation, device setup, game launch, and basic tuning
1. Software Installation
- Click the button below to download the installer:
- After the download is complete, double-click the installer to start the installation.
- If the installation does not begin after double-clicking, your PC may be missing the required runtime environment. Please click the links below to download and install the two official Microsoft runtime packages:
https://aka.ms/vc14/vc_redist.x86.exe
https://aka.ms/vc14/vc_redist.x64.exe - After the downloads are complete, double-click each file and finish the installation. Then begin the MOZA Motion Manager installer again to install the software.

2. Firmware Update
- Open MOZA Motion Manager.
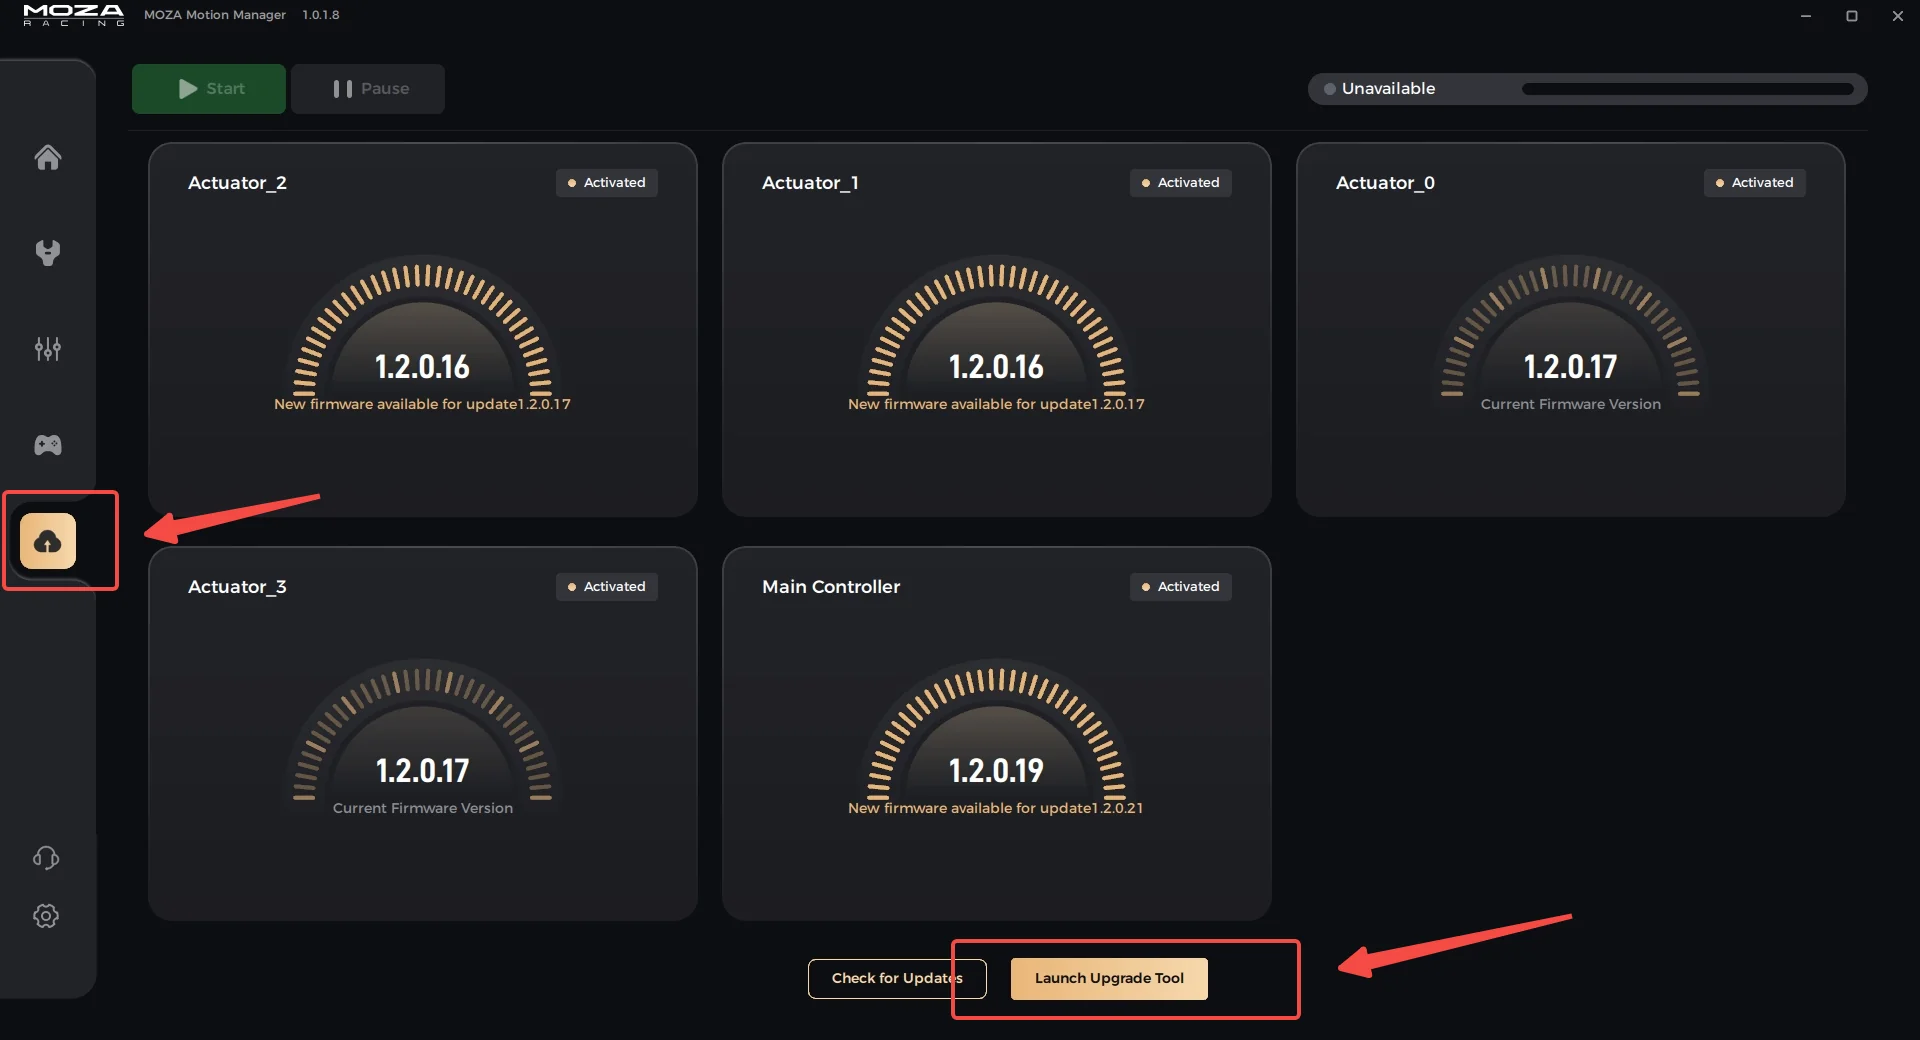
- Go to the firmware update page.
- Click <Launch Upgrade Tool> to open the firmware upgrade tool.
- Update the controller and all 4 actuators to the newest versions.

3. Device Connection
- Connect all 4 actuators to the same controller.
- The controller has 8 ports. The 4 actuators can be connected to any 4 ports. There is no required port order or fixed port-to-position mapping.
- Connect the controller to the PC using the data cable.
- Connect power to all 4 actuators and make sure they are powered on.
- Open MOZA Motion Manager and go to the device configuration page.
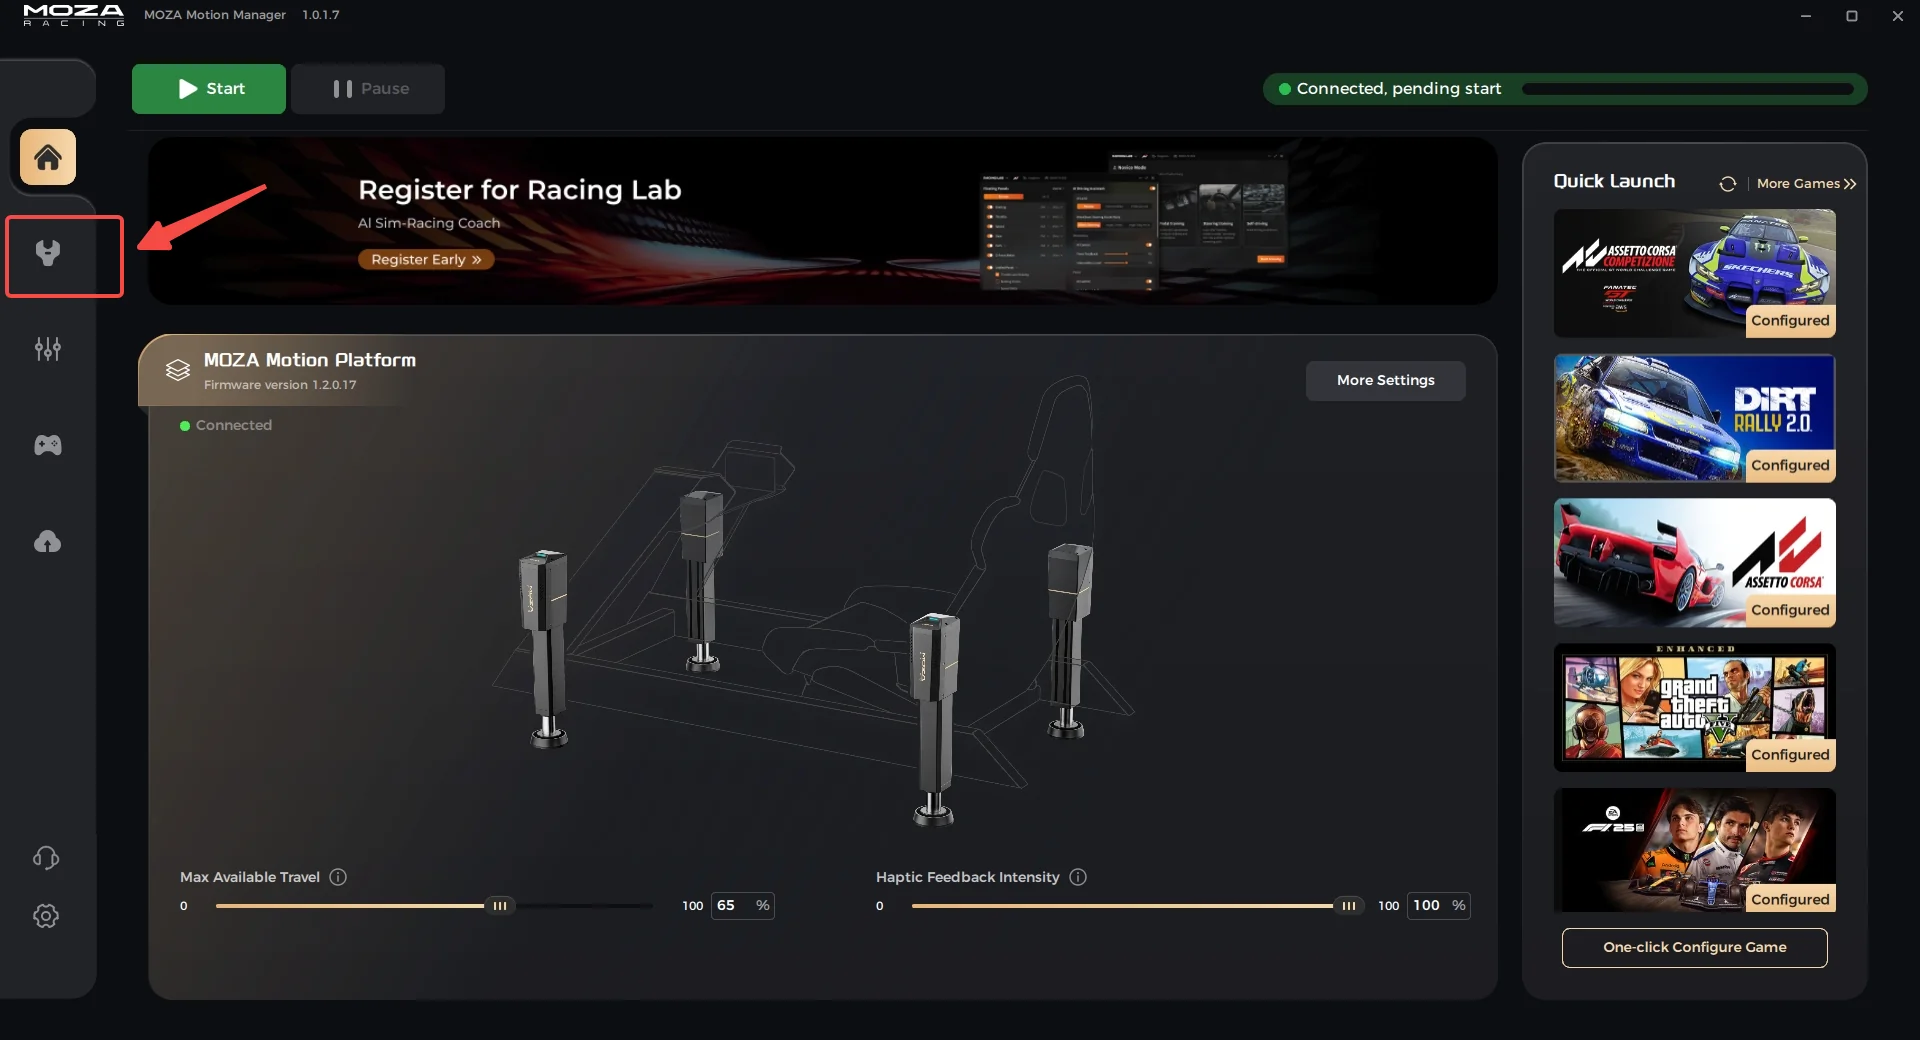
4. Actuator Port Configuration
On the configuration page, complete the Controller Port Connection setup first.
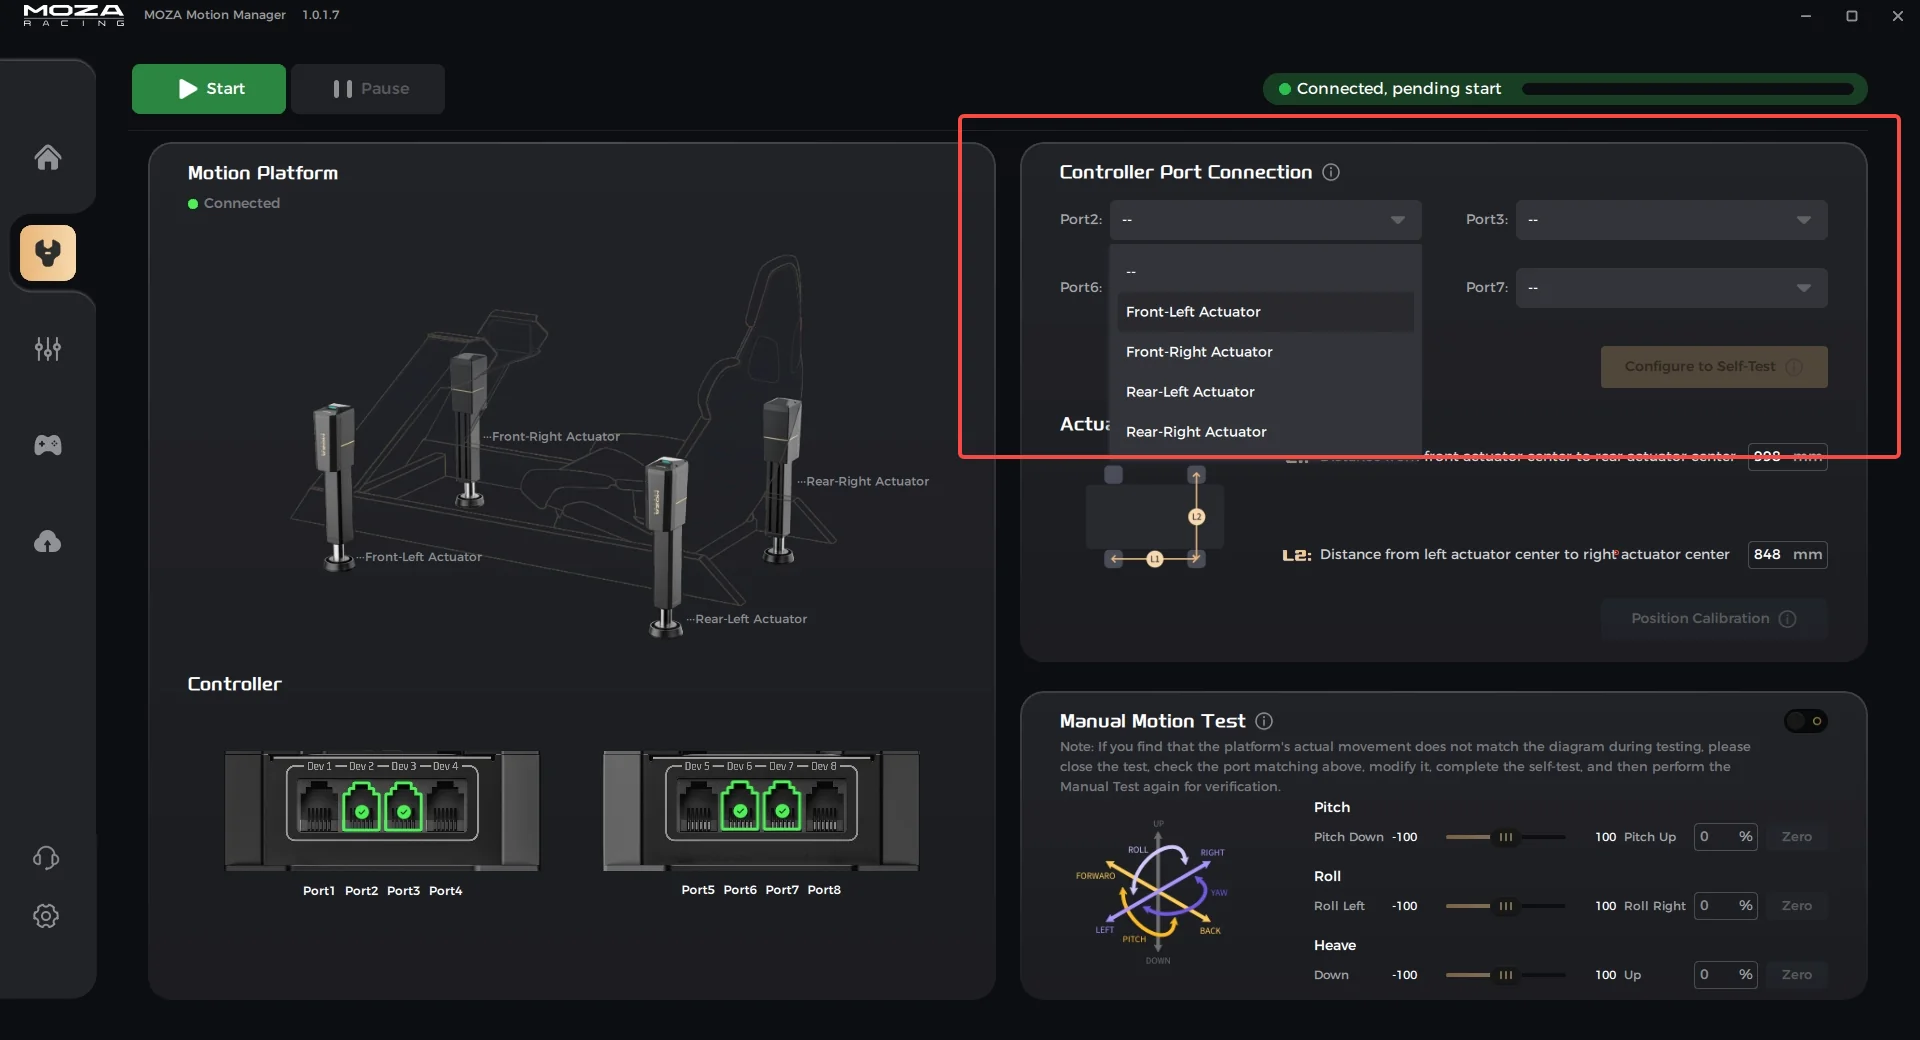
- Connected actuator ports will appear in the configuration area. By default, they are shown as unconfigured "--".
- Click the dropdown menu for one port.
- When the dropdown is opened, the LED on top of the corresponding actuator will change from solid white to flashing red. Use the flashing red LED to identify the actual position of that actuator on the cockpit.
- Select the correct mounting position from the dropdown menu.
- Repeat the steps until all 4 actuators are correctly assigned.
5. Apply Configuration and Run Self-Test
- After all 4 actuator ports are configured, click <Configure to Self-Test>. The software will send the configuration to the device.
- Wait for the device to complete the basic self-test.
- Do not power off the device, move the platform, or operate the seat during the self-test.

6. Position Calibration
- After configuration and self-test are complete, click <Position Calibration>.
- The device will automatically detect the installation distance between the actuators and fill in the values in the software.
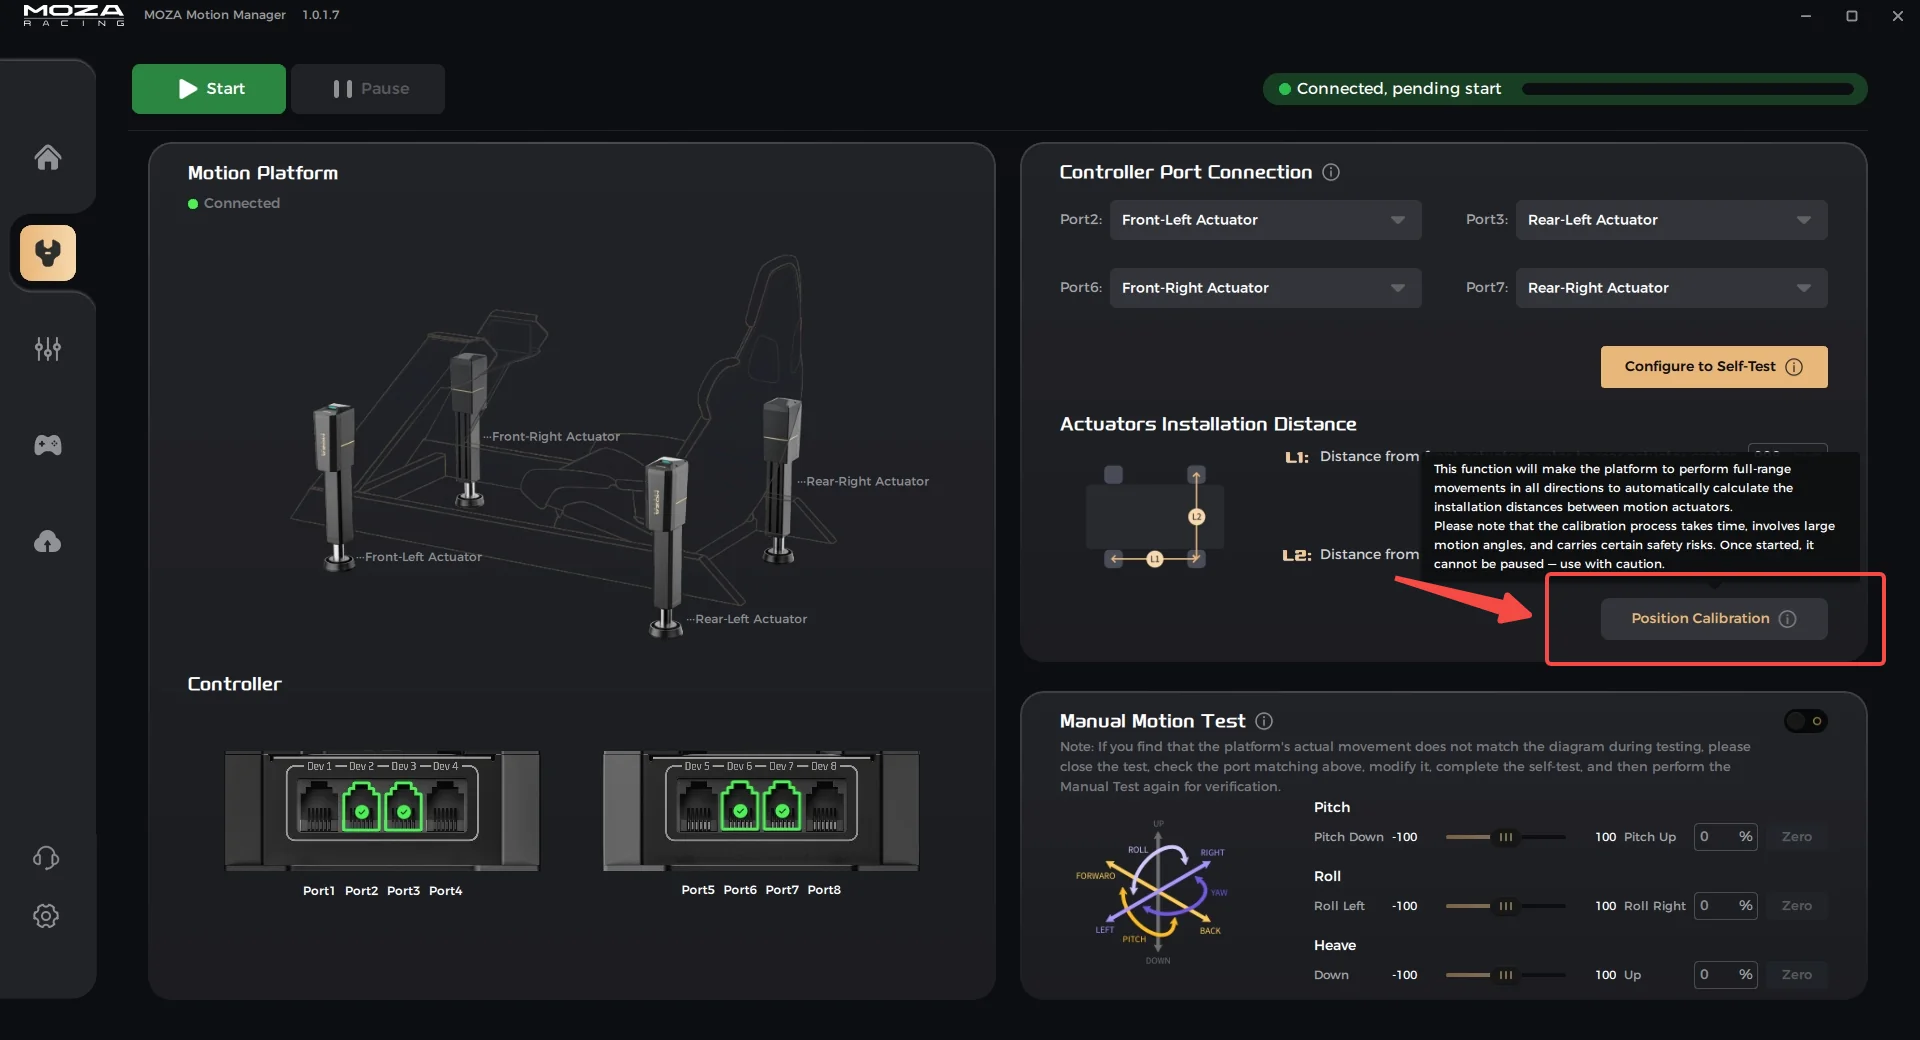
- A position calibration will be recommended after the device is configured for the first time.
- The device will move slowly during calibration. Please do not shake the seat or get on/off the seat during this process, as this may affect calibration accuracy.
- If the automatically detected distance is significantly different from the actual installation distance, measure it manually and enter the correct value in the text box.
7. Enable the Device
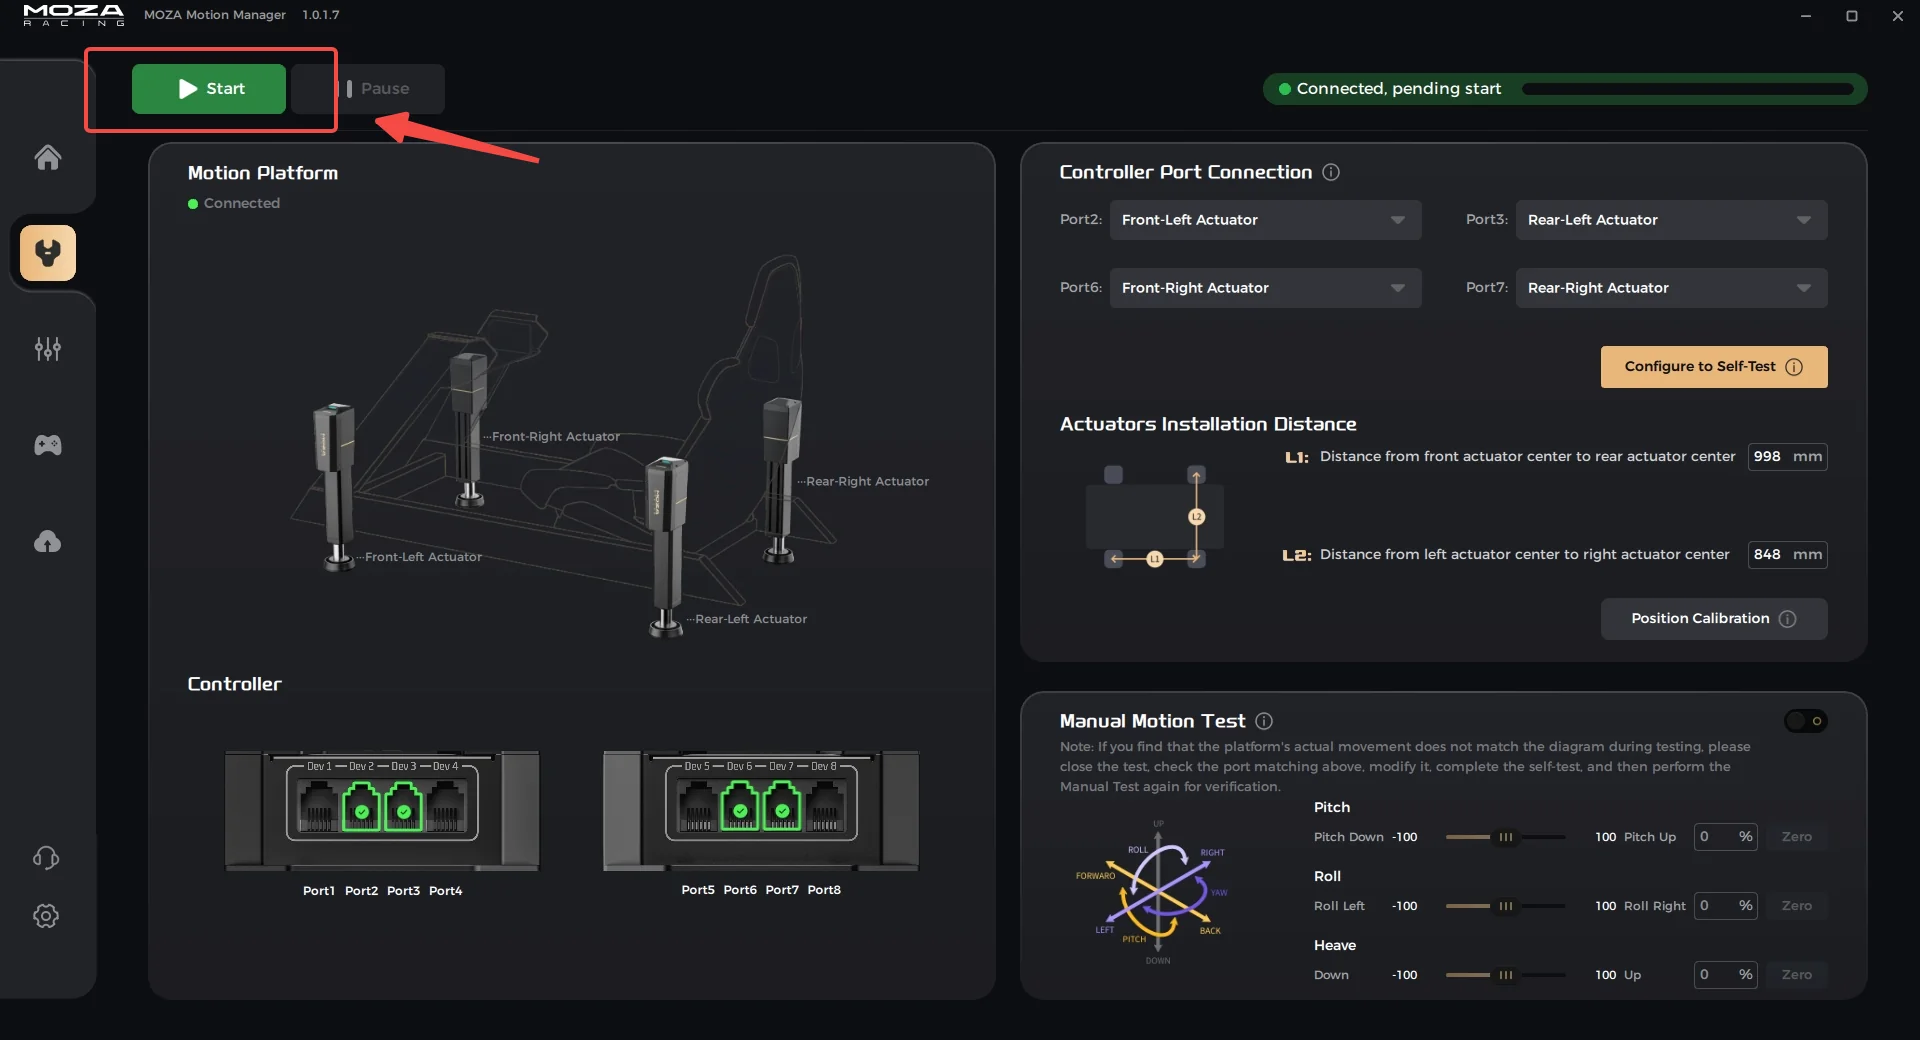
- After all configuration steps are complete, click the <START> button in the upper-left corner of the software. Once the device is started, it is ready for normal use.
- To pause the device, click Pause.
8. Game Configuration
- Go to the Game Library page.
- Find the game installed on your PC.
- Follow the instructions in the software to complete the Path Setting and game Configuration.

9. Launch the Game
- After the game configuration is complete, click Launch on the Game Library page. You can also use Quick Launch on the right side of the Home page.
- Make sure the device is in START status before starting the gameplay experience.

10. Motion Tuning
During actual use, you can adjust the motion effects based on personal preference. It is recommended to adjust only a small number of parameters at a time, test them in game, and then continue fine-tuning if needed.

11. Pre-Use Checklist and Troubleshooting
If the device does not respond, moves abnormally, or there is no motion feedback in game, please check the items above first. If the issue persists, record the software version, firmware versions, game title, and reproduction steps, then send the information to the MOZA team.
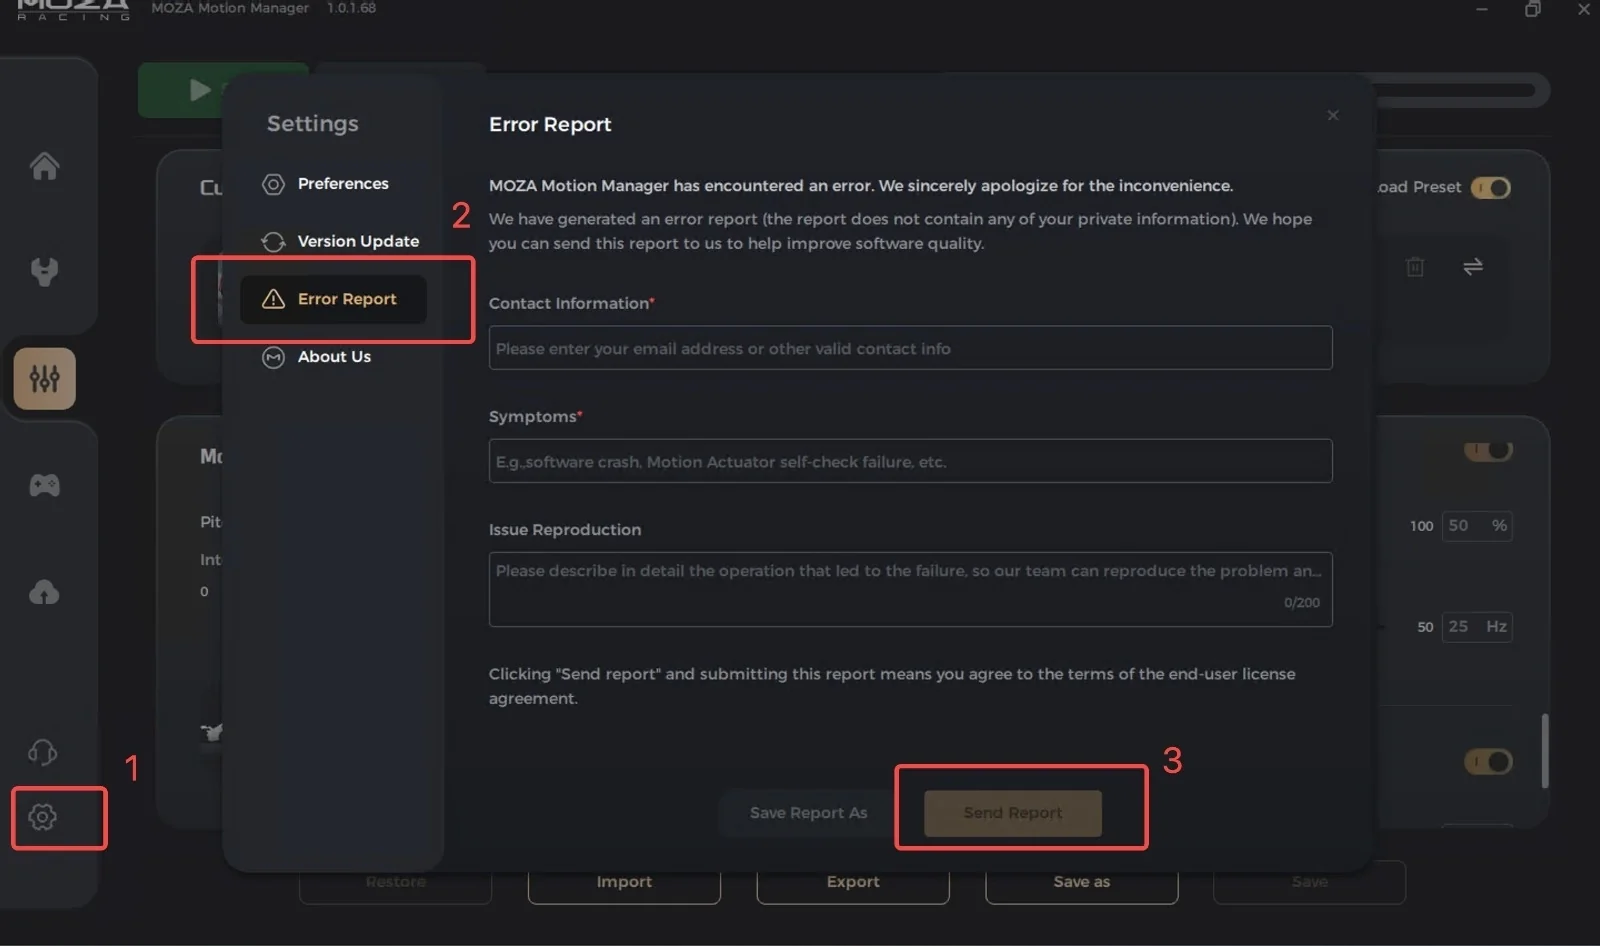
Error Report submission path
Settings in the lower-left corner → Error Report section → Fill in the required fields → Click Send Report
Was this article helpful?
That’s Great!
Thank you for your feedback
Sorry! We couldn't be helpful
Thank you for your feedback
Feedback sent
We appreciate your effort and will try to fix the article